|
Electrical - Day One
Prerequisites for Electrical:
The electrical sub is responsible for hooking up all the electrical connections and components necessary to operate all the pool equipment (pumps, heaters, pool/spa lights, electronic-based chlorinators, equipment controllers/timers, ...) and any other auxiliary electrical components you may want (extra lights, outdoor outlets, switches, controllers, ...). They are also responsible for insuring that the installation electrical components meet the minimum safety requirements of the National Electrical Code (NEC) standard and whatever other local requirements
 
CONTINUED BELOW
ADVERTISEMENT
The base standard for most electrical subs here will include something like this:
- Up to 50 ft of 1/2" conduit run from main electrical service panel to equipment.
- 20 ft of 1/2" brass run for pool light
- 1 - 100W, 250W, or 400W pool light
- Pool light junction box (GFCI protection for light)
- Light switch
- 1 motor (pump) hookup
- All bonding (connecting metal chassis and pool components) to meet code
The base price for all this starts at a little over $500. Any additional length for the main or brass runs will incur a per foot extra charge. Also, as the distance grows between the main electrical service panel and the equipment, the wire gauge and correspondingly, the conduit size may have to also increase due to the need to offset voltage drops due to wire resistance over the longer runs.
Here is what I wanted to do for my electrical work (you can click on the picture or here for an enlarged version).
-
Main Run - the blue line represents the main EMT line that runs from the main electrical service panel at the front of the house to the equipment in the back. Its about a 150ft run which starts at the front of the house on the right and ends in the back of the house on the left. The electrical run is long due to my desire to shorten the gas run, which is much more expensive (about $9/ft).
-
Pool/Spa Lights - the yellow line represents the brass runs for the pool and spa lights. There are two pool lights (400W each) and one spa light (100W).
-
Low-Voltage Aqualink Controller Run - the aqua line represents the low voltage run for the Jandy Aqualink remote control to the spa and the main controller to the house.
-
Overhead Flood Lights - the red line is the run for the overhead dual flood lights. The dashed red line is for wire run above ground along the house eaves to the lighting fixtures at the 3 locations (marked by a (D) ) shown in the picture and the solid red line is for the underground run for the far light.
-
Auxiliary GFCI Outlets - the green line represents the branch lines for all 110V auxiliary outlets. There will be one at the BBQ, another one at the far end of the pool, and two near the equipment (one for LV landscape transformer, and another one for future use).
-
Low-Voltage Landscape Run - the dashed brown line is the low-voltage loop for landscape lighting. I could have done the low-voltage as two strands coming from the equipment, one strand to the back side of the pool and the other to the front side. The electrician said that similar to the plumbing return loop, if I looped low-voltage run, I would insure that each lighting fixture attached anywhere along the loop would get the same voltage. Having long individual strands increases the chance that lights near the end of the run would be dimmer than the ones closer to the equipment.

To control all the equipment, I decided to go with Jandy's Aqualink system. I had first heard about the system while doing all my pool builder visitation. It seemed by far the best system out there. It made automation a snap. It had electronic valve actuators to automate the Jandy valve turning. It also had a one-button remote  control, meaning you could program a button for scenarios, say "Night Spa Mode." With that, one button could turn on the spa jet pump, heater, and blower pump, while turning turning off the filtration pump and changing the valves so that only the waterfall to the spa would be activated. It even had remote access capabilities so that you could call in to the system over the phone or over a PC to control it. This was the reason the Aqualink system was also the most expensive. One pool builder said that for my setup, it was going to be in the neighborhood of $3000 for the complete system. Ugh. The Aqualink system comes in a variety of different equipment configurations (e.g. pool only/spa only, pool/spa combo, and pool/spa dual equipment). Since my setup called for a sharing of the equipment, I needed the pool/spa combo unit. Aqualink also has different models based on the number of functions you need to program. It starts with RS4 (which controls up to 4 options) and can go as high as RS16. I counted up my functionality (you can see them listed in the diagram) and determined I needed an RS8. control, meaning you could program a button for scenarios, say "Night Spa Mode." With that, one button could turn on the spa jet pump, heater, and blower pump, while turning turning off the filtration pump and changing the valves so that only the waterfall to the spa would be activated. It even had remote access capabilities so that you could call in to the system over the phone or over a PC to control it. This was the reason the Aqualink system was also the most expensive. One pool builder said that for my setup, it was going to be in the neighborhood of $3000 for the complete system. Ugh. The Aqualink system comes in a variety of different equipment configurations (e.g. pool only/spa only, pool/spa combo, and pool/spa dual equipment). Since my setup called for a sharing of the equipment, I needed the pool/spa combo unit. Aqualink also has different models based on the number of functions you need to program. It starts with RS4 (which controls up to 4 options) and can go as high as RS16. I counted up my functionality (you can see them listed in the diagram) and determined I needed an RS8.
When I decided I was going to GC the pool, I wanted to find out what kind of mark-up the pool builders put into the Aqualink system. When I got the bids back from two different electrical subs, I saw that the Aqualink system was between $2000 to $2300. It was better, but still not what I was willing to pay. I decided to see what I could find all the parts for over the Internet. I was pleasantly surprised that there were a number of Internet pool supply E-tailers to choose from. I found the Aqualink Power Center and the 4-button Spa-side remote at a place called bargainpoolsupply.com for a great price ($255 and $139 respectively). It was also a pleasant surprise that many did online price matching. All I had to do was show them the URL where the cheaper price could be found and they said they would match it. Very nice. The killer find, however, was when I located the Aqualink RS8 control unit on Ebay. It normally runs about $1400, but I saw a listing one day that started the RS8 at $600! It turned out that someone had a unit at a trade show and wanted to get rid of it. I was able to pick it up for $811. When I received it, it was still sealed in the factory box. For the combination RS8, Power Center, and spa-side remote, I paid about $1200.
  
Of all the subs I had dealt with thus far, the electrical sub was the hardest to decide on. There was no clear cut winner here. Both of the subs that I had whittled the competition down to had good reputations and had no problems with the Registrar of Contractors. The big difference between the two was one was charging close to $1000 more for the work. That sub happened to be a lot bigger company, more established, with more employees, more overhead, etc., etc. The extra $1000 was due to extra markup on the Aqualink system and charging about $0.50 to $0.75 more per foot for their runs, independent of the size of the conduit or wire size. In the end, I decided to take a little bit of a risk and go with the smaller company and lower price.
Friday, August 30, 2002 - 8:45AM
 The electrical guys arrived as the steel guys were starting to wrap up. This was the first time in the project that I actually had two subs in at the same time. They overlapped by about half an hour. This didn't really pose a problem as the steel guys were finishing up the waterfall work and no electrical work needed to be done in that area. While there were many times when multiple subs could have been working at the same time, I typically didn't want more than one there at a time. I'm usually pretty nosy and like to ask a lot of questions. Having more than one sub would have prevented me from doing that. Its also harder to take pictures of every significant event that is happening when you're trying to document more than one sub. Louis was the foreman/crew lead on the job. He's been with the company for about 2 years and just recently started leading his own crew. The electrical guys arrived as the steel guys were starting to wrap up. This was the first time in the project that I actually had two subs in at the same time. They overlapped by about half an hour. This didn't really pose a problem as the steel guys were finishing up the waterfall work and no electrical work needed to be done in that area. While there were many times when multiple subs could have been working at the same time, I typically didn't want more than one there at a time. I'm usually pretty nosy and like to ask a lot of questions. Having more than one sub would have prevented me from doing that. Its also harder to take pictures of every significant event that is happening when you're trying to document more than one sub. Louis was the foreman/crew lead on the job. He's been with the company for about 2 years and just recently started leading his own crew.
When they arrived, I mentioned to them I was ordering all the Aqualink stuff from the Internet and that it would be a few days before everything arrived. They told me that was fine. They said all they would do then is the minimal electrical rough work needed to pass the pre-Gunite inspection and come back another day to do the rest of the hook-up, lighting, remote control, etc. They said that with the amount of work I wanted, it was going to be a 2 day job anyways. That sounded good to me. The bare minimum electrical rough work needed for passing pre-Gunite inspection was the following:
-
Install pool and spa light wells and bond metal to pool chassis.
-
Install empty sub-panel at main electrical service panel
-
Install all underground runs:
-
Run 1/2" PVC from equipment area to spa for Jandy 4-button spa-side remote
-
Bond all metal within 5 feet horizontal or 12 feet vertical of waters edge to the pool steel (per NEC standard)
All the electrical work that is done must be left exposed (lines to be buried cannot be backfilled with dirt) until the inspection has been completed. This insures that the inspectors can examine the conduit that is laid and can verify that the materials and workmanship meets NEC standards (NFPA-70), which is the national code for electrical work for residential applications. Understanding the NEC standard and the approval body work is a fascinating study in and of itself. The NEC standard addresses proper electrical systems and equipment installation to protect people and property from hazards arising from the use of electricity in buildings and structures. The NEC is constantly being revised, corrected, and amended, but the handbook which documents the current set of NEC codes comes out only once every 3 years. This means that even the most current version of the NEC standards codebook may be out-of-date 6 months after its published.
The first order of business was to install the sub-panel near the main service panel. The crew-lead did that work. Here's a look at that:
  
He used #6 wire to run from the main to the sub-panel and installed a 50A breaker. I asked him if that were enough. We went through a rough calculation of all the current draws from the pumps, lights, and other auxiliary items and he agreed to beef it up. He didn't have anything higher at the time so he promised he would bring a bigger breaker when they returned.
Just behind the wall, they decided to run the 1" conduit up against the bottom 2" ledge that ran about 6 inches off the ground along the edge of the house. He punched a hole through the bottom of the wall where the wall met the house and ran his metal conduit through that. They didn't run it all the way to the back. They just started it but said that it wasn't needed to pass the pre-Gunite inspection.
 
Meanwhile, the other electricians were busy in the back with the pool lights and the brass runs from the pool lights to the equipment. Here they are performing that work:
  
In the pictures above in the middle and to the right, you can see them adjusting the light fixture. They need to position it so that it extends out 3" past the steel frame. The outer edge of the pool light should roughly coincide with the surface of the pool shell, which will be 3" past the steel frame. Per NEC, the top of the fixture must be at least 18" below the water line. The intent here is to keep the fixture away from a person's chest area, because the heart is the vital part of the body involved with electric shocks in swimming pools. This requirement insures that the chest of a swimmer, who is hanging onto the edge of the pool, is not near the fixture.
 They ran the 1/2" brass run under the form and steel and ran it in the same trench with all the PVC all the way back to the equipment. You can see this in the picture to the left. All this will be covered up by the shotcrete pool shell and the pool decking eventually, so it didn't really matter where they laid it down. They ran the 1/2" brass run under the form and steel and ran it in the same trench with all the PVC all the way back to the equipment. You can see this in the picture to the left. All this will be covered up by the shotcrete pool shell and the pool decking eventually, so it didn't really matter where they laid it down.
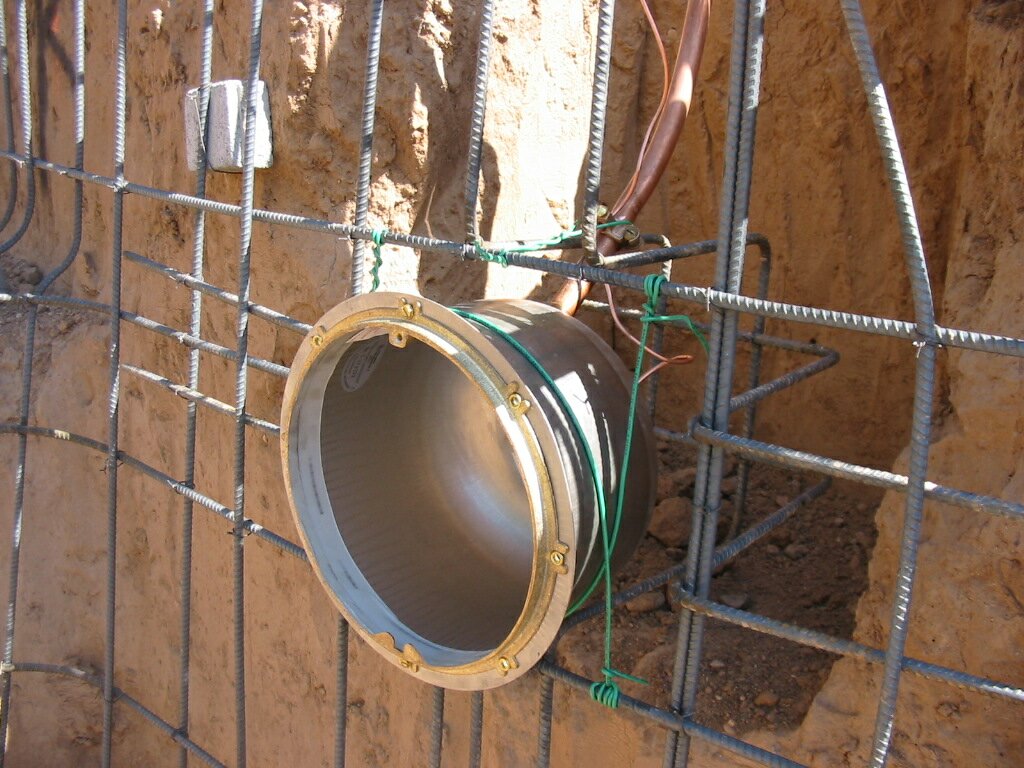
You can see in the picture below to the left how they used a heavy gauge wire (green) to strap the light fixture in place. At this time they also grounded the light niche to the steel in the pool. The light niche being installed is a wet light niche, which means that its designed to have water in it. This is important as the water helps to keep the 400W light bulb cool. Water flows into the niche canister and up into the brass conduit. The conduit will contain water at the same elevation as the water level in the pool. The junction box at the other end of the niche connected by the brass run is raised higher than than the water level of the pool so that the water can't go above it. Per NEC standard, the junction boxes are required to be at least 8 inches above the normal water level, and 4 inches above the pool deck, whichever is higher. The junction boxes must also be at least 4 ft. away from water's edge, although some states have more stringent requirements. All wet and dry niche lighting fixtures must be grounded for undesirable fault currents per NEC standard. Also, the lights must be GFCI-protected. This is extremely important as raw 120VAC and water are not the best of friends. With GFCI protection, detection of even micro-amps will break the circuit, preventing a shock that could easily kill a person. The grounding of the light niche to earth ground also insures that the quickest way for a short to travel to ground is through this heavy gauge ground wire instead of through the water and people in the pool.
You can see in the picture below (click on it for a close-up) in the middle how they connect a grounding wire from the brass conduit and clamp it to a metal rod in the pool frame. The picture to the right shows that same pool light from a different perspective when its done. Also, the way they position the light, the surface of light fixture should be positioned about 3" away from the steel. This is to account for the shotcrete thickness from steel to surface.
  
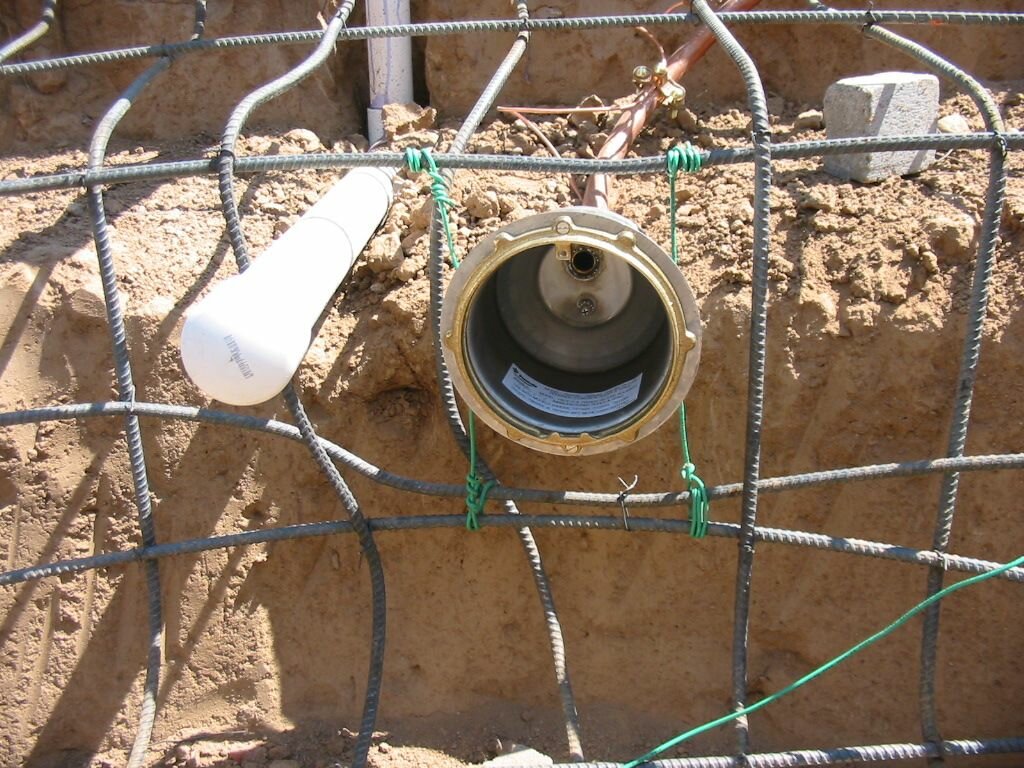
One of the other crew members went off to do the spa light, which is done identical to the pool light only with a smaller fixtures. Here are some pictures of him working on that:
  
Here are a couple of shots of the brass runs being laid in the same trench as the PVC and being run all the way back to the equipment:
 
The next order of business was to run the 1" main EMT conduit to the equipment pad. The run didn't actually start from the main service panel. The start of the run was at the end of a junction box. Junction boxes are installed at points along a run if a run gets too long or if there are more than four-90 degree bends in the conduit. This rule keeps wire pulling manageable. After the conduit is laid down, the electricians need to pull the feeder wires/branch wires through the conduit. It becomes nearly impossible to do if there are more than 360 degrees of bends in the conduit. The first picture below to the left shows where a junction box will be located. The main conduit run from the main service panel will run along the under lower eave of the house until it hits this junction area, where a junction box will be installed. From there it will go underground, with no more than 360 degrees of bends until it hits the equipment area.
  
One other note about this 1" main EMT conduit run. EMT conduit stands for Electrical Metal Tubing, which is a thin wall galvanized steel pipe used to carry electrical or other types of conductors. The EMT tubing they used had some type of dark electrical tape wrapped around it. I was told by the crew that anytime steel conduit is buried into the ground, it must have electrical tape wrapped around it. Over time, steel will break down due to the chemicals and other natural chemicals found in the soil. The electrical tape inhibits this corrosive chemical reaction from occurring. Leaving the open trenches exposed with the EMT conduit laying in it allows the inspectors to examine the conduit to make sure that all the proper materials are being used.
The picture below to the right shows where the main ends up near the equipment pad.
 
I wanted an extra 110VAC GFCI outlet out near one end of the pool where there will be decking. I would use this for small appliances when out on this side of the deck. They ran 1/2" EMT conduit out to the corner of the yard as shown in the picture to the left. The picture to the right shows where is run is terminated - right at the same place where the junction box will go.
  \ \
Since I wanted a spa-side remote control, they also ran 1/2" PVC from the equipment out to the side of the spa. You can see that pipe sticking out of the first step in the spa.
 
A few more items were required to complete the electrical rough. They needed to bond any/all metal within 5 feet of waters edge. This meant that the fireplace exhaust coming out of the back wall of the TV niche needed to be grounded. You can see a picture of that below to the left. Also, they needed to cover up all light well openings before shotcrete guys arrived. You can see that in the picture to the right.
 
  And that's about it. They were done by 1:30pm. At the equipment, I had three brass runs, one for each light. I had the main 1" conduit that ran from the junction box at the corner of the house to the equipment, and I had a 1/2" PVC run for the spa-side remote. The picture to the right shows the state of the pool after the electrical rough was complete. About the only thing you see are the pool lights. And that's about it. They were done by 1:30pm. At the equipment, I had three brass runs, one for each light. I had the main 1" conduit that ran from the junction box at the corner of the house to the equipment, and I had a 1/2" PVC run for the spa-side remote. The picture to the right shows the state of the pool after the electrical rough was complete. About the only thing you see are the pool lights.
When the electricians come back, that's when the real work starts. That's when they have to pull wires through the conduit, install the overhead flood lights, install the breakers into the sub-panel, install the switches, install the Aqualink system, etc. This was just the pre-work, to get me past inspection. And actually, I'm still not quite ready for inspection. I still need to call back the plumbers to finish up the work in the spa dam wall. They still need to complete the therapy jet loop, blower loop, and a bunch of other miscellaneous things. But hey, I'm getting closer, and that's what counts. Next up, plumbers again!
<- Steel - Back Next - Plumbing Day Three ->
|